Cheeks · The Journal
Blush Is Back — and Placement Is Everything
Where you put it matters more than which shade you pick. A real guide to draping, layering, and looking lit-from-within.
Blush went from afterthought to main event
For years, blush was a nervous little dusting on the apples of the cheeks, applied with the vague hope of “looking healthy.” That era is over. Blush is now the mood of the whole face — draped high toward the temples, feathered under the eyes for a lit-from-within flush, layered for that just-came-in-from-the-cold glow. And here's the part that surprises people: the shade barely matters compared to where you place it. Placement is the technique; color is almost a detail.
Placement theory, by face shape
Think of blush as a tool for directing the eye. Placed high — up along the cheekbone and blended toward the temple — it lifts and elongates the face, which flatters rounder shapes and adds structure. Placed right on the apples, it reads younger, softer, and rounder, which balances longer face shapes. Swept across the nose and the tops of both cheeks together, it creates that ethereal, sun-flushed look everyone's chasing. None of these is “right” — they're different effects, and once you know them you can choose the face you want that day instead of doing the same dusting on autopilot.
✦ · see it · ✦
✦ blush, reimagined ✦
the heart-shaped blush everyone's obsessing over
A cream-to-powder finish that melts into skin for that perfect, natural flush — here's an alternative pick that pairs beautifully with our own collection.


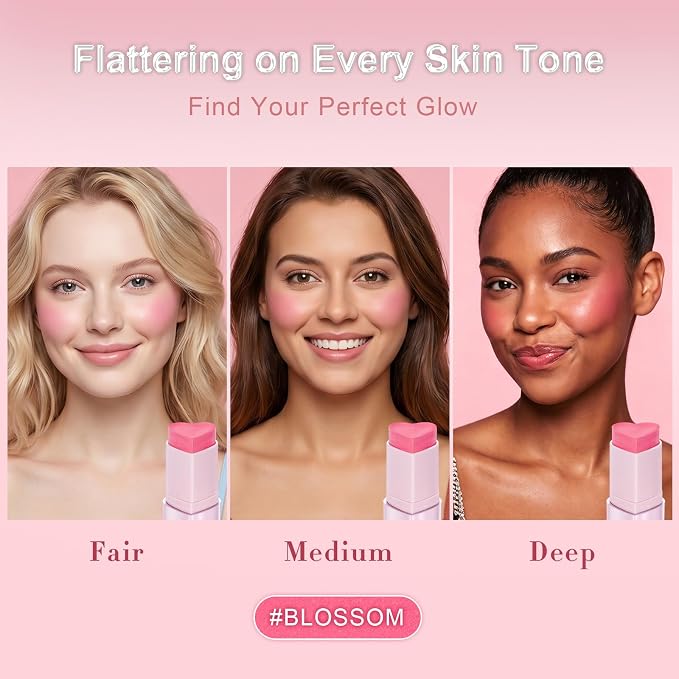


Design by victoria
◆ the technique
why cream-to-powder blush behaves differently
It applies wet like a cream, blending seamlessly into skin, then sets to a soft natural powder finish — giving you the easy blendability of cream with the long wear of powder, without picking one over the other.
◆ placement matters
the smile-and-tap method
- Smile first — the apples of your cheeks are exactly where a natural flush belongs
- Tap, don't rub, for the softest color payoff
- Build up gradually — cream formulas are easy to sheer out, but hard to remove once set
◆ shape talk
why a heart-shaped bullet actually helps
The pointed tip lets you get precise with placement (right at the apple of the cheek), while the rounded sides let you sweep and blend outward in one motion — one shape doing two jobs.
◆ pairing tip
what to layer underneath
Cream blush sits best on a dewy or satin base — over fully matte foundation it can grip unevenly. A light setting mist afterward helps everything melt together seamlessly.
✦ unlock 50% off ✦
Tap below to reveal your exclusive discount code for the HECI BEAUTY Heart-Shaped Blush.
your code
7HI8Q55I
Valid through August 31, 2026 — 50% off at checkout on Amazon.
As an Amazon Associate, I earn from qualifying purchases. This post contains affiliate links and a sponsored discount code.
Cream versus powder — and why you might want both
Cream blush melts into the skin for a dewy, second-skin flush, and because you can apply it with a finger it's almost impossible to overdo — you build slowly and stop when it looks alive. Powder blush holds up longer in heat and humidity and layers cleanly over other powders. Lots of people do both: cream first, pressed in for that from-within glow, then a whisper of powder on top to set it and make it last. Cream for the look, powder for the longevity.
Draping and layering, step by step
To drape: smile slightly to find the apple, then sweep color up and back along the cheekbone toward the temple in a soft diagonal, keeping the most intense point on the cheekbone and fading it out. Blend the edges with whatever's left on the brush or your fingers so there's no hard line — a hard edge is the only real way to “fail” at blush. To layer, build in thin passes and check in natural light between them; it's far easier to add than to scrub back.
The under-eye flush, carefully
One of the prettiest modern tricks is bringing a tiny bit of blush up under the eyes and across the top of the cheek — it fakes a genuine, rested, slightly-flushed look. The word doing the work here is tiny. A little, well-blended, reads as glowing health; too much reads as, well, a rash. Use the barely-there remnants on your brush, tap it in with a finger, and build only if you truly need to.
Building a healthy look versus a done look
The same blush can say “I slept nine hours and drank water” or “I have a full face on,” entirely based on restraint and placement. For the healthy version, keep it sheer, blended, and slightly diffused past the edges. For the done version, concentrate it, drape it high, and let it be a clear statement. Knowing which one you're going for before you pick up the brush is the difference between a face that looks effortless and one that looks like effort.
Cream or powder for your skin type
Skin type quietly decides which blush behaves. On dry or normal skin, cream is a dream — it melts in for a lit-from-within flush and keeps things looking like skin, not powder. On very oily skin, cream can slide as the day goes on, so a powder, or a cream set with a light dusting of powder on top, will hold better.
There's no universal winner, only what suits your face on a given day. When in doubt, cream first for the glow, a whisper of powder to lock it — you get the best of both without committing to either.
Layering blush with bronzer and highlight
Blush rarely works alone. A touch of bronzer to warm the perimeter of the face gives the blush somewhere to sit, so the flush reads intentional rather than like two random pink spots. A small highlight on the very top of the cheekbone, just above the blush, catches the light and lifts the whole thing.
Keep the order simple — bronzer to warm, blush for the flush, highlight to lift — and blend where they meet so there are no hard edges. That soft transition between the three is the entire difference between 'nice' and 'how is your skin doing that.'
The smile-and-tap method, in detail
Cream blush is almost impossible to mess up if you follow one sequence. Smile so the apples of your cheeks lift and round out — that's your target. Tap (don't rub) a little product onto the apple with a clean fingertip, then bounce it outward and up toward your temple in small pressing motions until the edges disappear. Build in thin passes; it's easy to add more and much harder to take away once it's set.
Working in natural light matters here — bathroom bulbs lie. A flush that looks perfect under warm yellow light can read heavy in daylight, so check a mirror by a window before you decide you're done.
Making a cream flush last all day
Cream blush wears longest over the right base. It grips best on skin that's dewy or satin — over a fully matte, powdery foundation it can cling unevenly, so apply cream products before you set your face with powder. Press it in with a finger for warmth, then, if you want extra staying power, dust a matching powder blush lightly on top to lock it.
A fine setting mist at the very end melts the layers together so nothing looks like it's sitting on the surface. Done this way, a morning flush is still there at dinner — no touch-up required.
✦ Quick tips to save
- Blush high toward the temple lifts; on the apples reads soft and youthful.
- Cream with fingers is the most forgiving way to build a natural flush.
- A tiny bit under the eyes (well blended) fakes a genuine rested glow.
- A hard edge is the only real way to fail — always blend the border out.
Learn to place blush and you've learned the fastest way to look healthy, awake, and lit from within. It's the single most underrated step in the routine — and once it clicks, you'll never go back to a nervous dusting on the apples.
Get the next one first
New posts, honest picks, and real codes — straight to your inbox. No spam, ever.
Unsubscribe anytime. One email, that's it.
As an Amazon Associate, AuraPop earns from qualifying purchases. This post contains affiliate links.
✦ Keep reading The Journal ✦